
Maybe hate is too strong of a word to use in this case. But have you ever worked on a project and hated every minute spent? I knew from the start I wasn’t going to like this sewing project but I’m just stubborn enough that I knew I would finish it. I didn’t enjoy it, however.
Starting out
As soon as I started working with the fabric (2 1/2″ wide strips), I knew I wasn’t crazy about it. I bought the kit for a table runner – the reversible Strippy Table Runner. Sounds easy enough, right?
Tim actually picked it out. He thought it looked “beachy”, which it does, I guess. But a lot of the colors are too pale for me. As I recently heard (in reference to frosting on a cake), I like my colors more “saturated”.
They are batiks, which I generally like. But if you look at the other batiks in my stash, you will see they are not these pale colors. I did my best to lay them out to create strips of six (per the pattern) with various colors and by the time I got to the end, all I had left were blue strips.
Blue is not one of my favorite colors and this has way too much blue in it. Ok, I guess I can live with that. Now to sew all those strips together.
Sewing the strips, cutting triangles and assembling
I don’t consider myself a quilter but I have been sewing for decades. These strips had pinked edges – you know, where they look zig-zagged? So, what should I consider the edge of the fabric? Is it all the way to the pointed edges or where the inside cuts are?

I’m not sure I was consistent with that and when sewing something like this, consistency is key in ensuring everything matches up.
I’ve since read that in quilting, you should sew scant 1/4″ seams, not an exact 1/4″. Great. Scant in sewing is like saying a pinch in cooking. It’s up to interpretation. (Actually, I just read that the term scant is used in cooking too!! Glad I haven’t seen that in any of the recipes I use.)
I created my six striped pieces and they looked OK. I then had to cut them into sections – squares and triangles. That was also easy enough, except it’s critical that they are squared up and not crooked.
Then I took those squares and triangles and turned them various ways for sewing together, providing that “strippy” look. Here was my first indication that my 1/4″ seems had not been consistent. Some seams didn’t match up as they should. And with this type of pattern, that’s very important. Ugh!!
Below is how it’s supposed to look. See how all those points and lines match up?

I have to admit, most of my lines and points do match. It’s just one section that doesn’t, but I want the whole thing to be perfect!!
Creating the backing
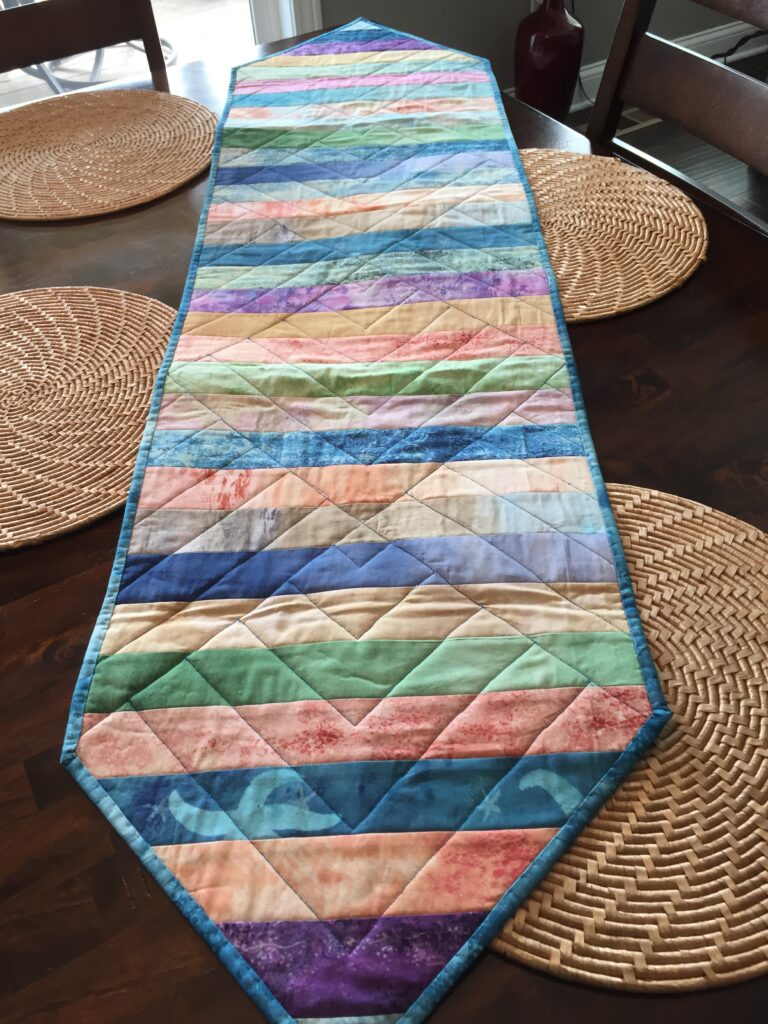
Did I mention this table runner is reversible? On the right below is how the back should look.

To create the back piece, I had to sew together the leftover pieces from the strips I cut into triangles and squares and then add a few more strips. For some reason, the length of mine was way longer than the pattern said it would be and I didn’t need those extra strips.
Then I had to cut that piece to be 24″ wide and a little longer than the completed front piece. OK, ready to quilt the front and back together.
Quilting the table runner
This is the point where I really hated this project.
The pattern recommended quilting by sewing “in the ditch”. If you aren’t familiar with that term, it’s simply sewing in the seam lines. As you can imagine, this design had a LOT of seam lines. Ick.
You’d think stitching in the ditch would be easy, right? I’m actually better at top stitching for some reason.
Because this had so many different fabric colors, I had to choose a thread color that I thought would complement them all. Since the binding and a lot of the strips were blue, I chose a blue thread.
I did a terrible job with the stitching. I’d been better off not trying to stitch in the ditch. Some lines look good and others are terrible. And of course, the blue thread makes all these mistakes jump out at you!!
I stopped sewing on it for a while. First, I wasn’t enjoying it. Second, I ran out of the blue thread and I wasn’t in any hurry to get more.
Finishing the project
In the meantime, I also saw an ad on either Facebook or Instagram about a presser foot for stitching in the ditch. Aha!! Is this the magical solution to all my problems?
I quickly purchased it and felt revived. However, I’d already pretty much ruined the table runner, so I viewed it as practice for the future.
Unfortunately, this didn’t improve my stitching. What’s the deal anyway? I admit, this wasn’t an expensive presser foot. Could that be the issue?
It kept getting stuck in the fabric and was kind of flimsy so the guide didn’t stay straight. I guess that’s another lesson learned. Maybe I still need practice? I don’t plan to give up, but it will be a while before I try it again.
I did ultimately finish the quilting and added the binding. Binding is something I do pretty well. But my heart wasn’t in it – at all.
What do I do with the finished project?
Once I was all done, I put it on the table and said to Tim, “Here is your table runner and I hate it.” He thought it was colorful and he’s always tactful when I show him something. I’m still not sure if he liked it.
The back almost looks better than the front. I have no idea how I’m going to use it.
But I finished it. So there.
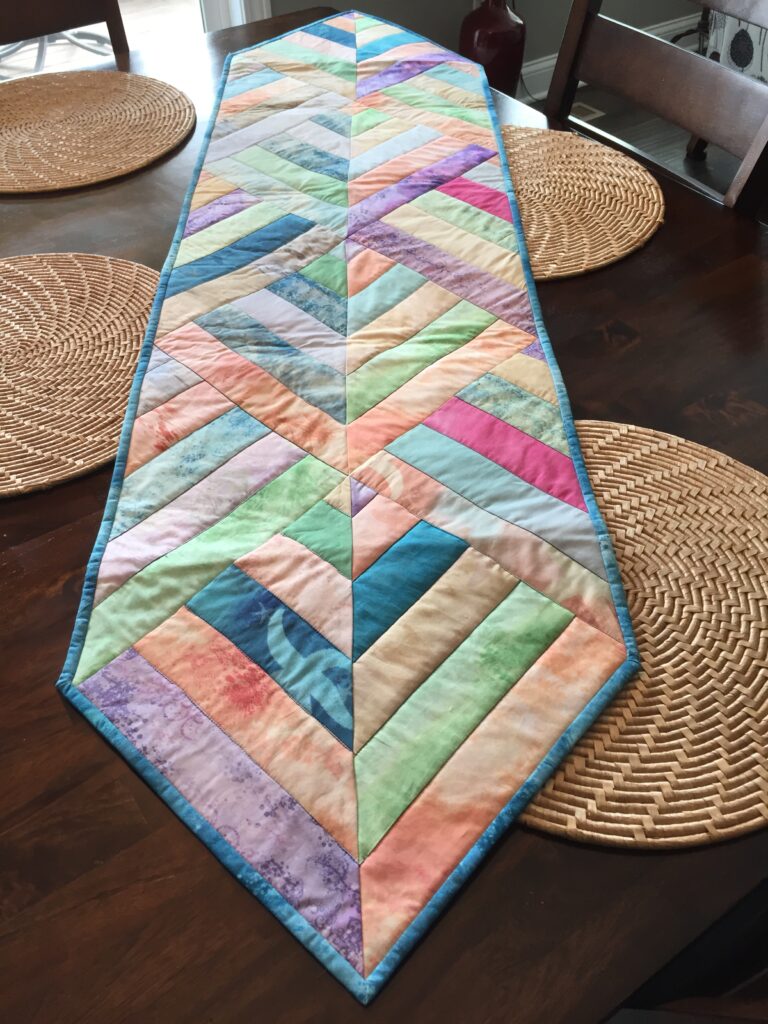
Here are a couple of pictures, if you’re interested. I didn’t shoot them close enough for you to see all my mistakes!!!
This also ended up being way longer than the pattern said it would be. Grrr. I hope I achieved my mistake quota on this project and my others will turn out better.

Front Back
You are probably the only one who will ever notice your mistakes in the runner. The pictures look good! But life’s too short to work on projects we hate!
Anyone who looks closely will see the mistakes, I’m afraid!! But you’re right. Next time I will admit defeat and quit!!
We are our worst critics, aren’t we? I think your table runner looks great but if it will give you heartburn every time you look at it, give it to someone who loves it. I have been sewing off and on (mostly off lately) for most of my life too and recently purchased a fairly expensive machine I JUST HAD TO HAVE. And, there it sits. Maybe your post will inspire me to use it for more than making some covers for our outdoor furniture (which turned out pretty well, even though I had to make my own pattern… as long as no one looks too close 🙂 ). Happy sewing!
Yes we are!! My husband suggested giving it to someone too, but I can’t think of anyone who might like it. Good luck with your new sewing machine. I posted recently about discovering my sewing machine after having it for 15 years. Don’t make my mistake by putting it off.