I recently came across notepads that I thought were cute and would make nice presents for friends. However, it didn’t seem right to just give someone a notepad. Sure, I could include it with something else, but I wanted the notepad itself to be something special. I wanted to jazz up a notepad.
I checked Pinterest, which is always my starting point, and found people had been creating holders for post-it note pads. I liked what they’d done, but my notepads are bigger than a three inch post-it pad. I found what I thought was the best design and tailored it to meet the size of my notepads, creating a pattern like the one in the example.
The notepad “creative” process
I selected paper – a main color and a contrast color – to go with each notepad. I did learn something through this. The example instructions mentioned “DSP”. I had no idea what that meant. I went to my other favorite source for information – Google – and learned it means “designer series paper”. In other words, paper that’s prettier (and likely with a design) than plain old cardstock. I never knew I’d been using DSP all along!!
I made a sample, although I probably can’t call it a sample, since I intend to use it. And I didn’t use DSP; I used two different colors of cardstock. It looks good, but for the other three, I did find pretty paper that provides a little more pizzazz. I decided they also needed something else to ramp up the pizzazz and used quilling to create embellishments.
Quilling
Do you know what quilling is? I’ve done just enough of it to know I like it, but I’ve only created very simple designs. According to Wikipedia, “quilling or paper filigree is an art form that involves the use of strips of paper that are rolled, shaped, and glued together to create decorative designs.” It’s fun and the end product is great in cardmaking, scrapbooking, and for me, decorating notepad holders. I’ve also seen examples of it used to create earrings, but that’s not for me!!
More to jazz up the notepad
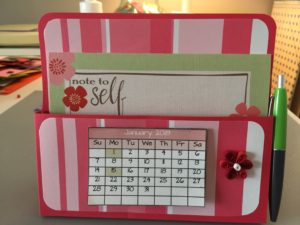
I also included a couple other things with the holders. I found some very cool mini pens on Amazon, which fit perfectly on the side, and just happened to be the right colors to go with mine. And, since one of the examples I saw included a mini-calendar on the front of the holder, I decided to do the same.
I started out using calendars I found online, but they were plain – just black and white. As is typical for me, one day it came to me, “I can make my own mini-calendars”. I went to my favorite tool – Excel – and created the calendars, with a different color combination for each notepad. It makes them more special. I also learned that I needed bookbinding glue in order to make the calendars such that you could tear off a month at a time. And, to ensure that the holders could be used beyond 2018, I used a sheet of the corresponding notepad to create a back sheet for the calendar. This way, when you get to the end of the year and tear off December, you’ll see a pretty design. Woo hoo!!
Here’s a picture of one. See how cute it is? It’s simple and quick too. See the cute flower I made by quilling?
If anyone’s interested in in how I made it and the materials used, let me know and I will add it to my Projects page.
Very cute!
So cute! Signed – Your “Uncrafty” Friend 😄
Love it!