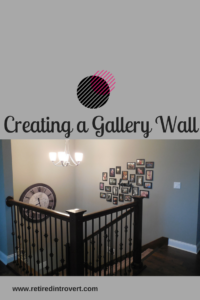
Do you have an empty wall but you’re not sure what to do with it? Have you ever thought about creating a gallery wall?
What would you put in your gallery? It can include whatever you like, whether it’s photos, artwork, or mirrors. We created a gallery wall in our house last fall and it was easier to pull together than you might think.
Using old/favorite pictures
Last fall, Tim decided to dig through several boxes full of pictures. He had a bunch and he wanted to sort them and distribute them to other members of his family, primarily his kids.
While going through the boxes, he discovered he had a lot of old family pictures. They were of family members he wanted to remember and it was sad to have them in boxes where no one could see them.
I’d always had a few older family pictures as well and thought maybe we could combine them into an interesting display.
Initially, we thought it would be cool to have all black and white photos. The older ones were obviously black and white, and there’s something interesting about a group of nothing but black and white pictures. But we decided it wasn’t worth reprinting the color pictures.
Choosing the right pictures
This was probably the trickiest part of creating the gallery wall. We wanted to be consistent in how we included family in the display. We had pictures of grandparents. We wanted pictures of our parents when they were younger as well as ones that were more current.
Siblings need to be included, as well as their families. Children and grandchildren, of course. We also dug up pictures of ourselves when we were younger and added a picture from our wedding day.
Should we include individual pictures of everyone or were group pictures acceptable? There’s really no right or wrong answer; it’s just making the decision. And it will be different for each of you.
The next decision was the size of each picture. Many of the older ones were 5×7. In some cases, Tim had multiple copies of the same picture in various sizes. My family wasn’t as diligent in taking or keeping pictures. I had to go through some of my mom’s boxes to find the right pictures. We postponed the size decision until we chose the pictures themselves. So then, how many should we use?
We started out with the pictures we liked and as we laid things out, we eliminated some of them. We’ve kept the discards together in case we ever want to change the pictures currently on the wall.
Determining where our gallery wall should be
We had already decided we wanted our gallery wall to be the one going downstairs. It is visible from upstairs and it would be easy to view any pictures close up. And it just seemed empty.
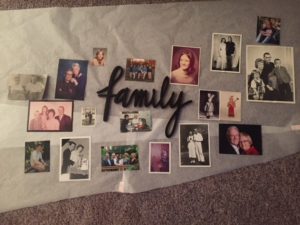
Once that decision was made, I cut out a piece of paper (I used the paper I use for sewing patterns, but you could even use newspaper) in the shape and size I wanted. I taped it on the wall to make sure it was actually the right size for the space, both in height and width. It’s a little tricky with a sloping wall, as you want it to follow that slope. I cut the paper to take that into account.
Once we had the size of the gallery determined, I took down the paper and laid it on the floor. That allowed us to place the pictures on the “pattern” to see what fit and how they should be organized. It also helped us finalize the size for each picture. Some pictures required reprinting in order to get them to the correct size. I made a few trips to Walgreens!!
Choosing the picture frames
We wanted consistency despite not having all black and white pictures. So, I searched for frames sold in groups. You certainly can use individual frames, and using different shapes and colors would make it more interesting. You can even buy collage frames. There are a lot of nice ones available. Some have a vintage look while others are more modern.
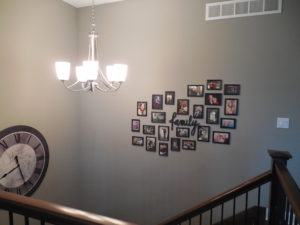
But we wanted consistency. I found some very affordable (some might say cheap) frames on Amazon, and I could get them in different sizes in groups of twelve. At that point, we decided we’d go with twelve 4×6 frames and twelve 5×7 frames – very simple black frames. That’s 24 pictures and we don’t even have a large family!!!
I also wanted a “family” plaque for the center of the gallery. I found exactly what I wanted at Hobby Lobby. I thought I might have to order it online but we were lucky enough to find it in the store. They have many different styles and right now, it looks like they’re 50% off!!
Hanging the gallery wall components
Once we determined where the center should be and hung the “family” plaque, we could easily place the pictures around it. I did take a picture of the final layout on the floor and Tim used that to hang all the pictures where we wanted them.
I think it turned out very well. We love it and can’t help but look at it often. It can, however, be a little tricky to keep all the pictures straight!!
If you have an empty wall you want to fill, don’t be afraid to try your own version of a gallery wall. It’s just a matter of determining your theme, the size of your space and the types of art you want to include. Laying it out on the floor first certainly helps you avoid unnecessary holes in your wall. Give it a try!!!
Maybe you already have a gallery wall of your own. Let me know what you’ve done. Better yet, include a picture!!
I really like your collection. Noticed it when I cared for the 🐱
Thanks, Mary. Glad you noticed it!!
It looks great. Nice job.
Thanks!!