Over the last few months, most of my sewing projects have become gifts. I love making things for others, and I hope they love getting them just as much. I try to think about each person when making something, choosing the pattern and fabric that I think is “just her”. This month, I finally got back to sewing for myself.
I don’t consider myself a quilter. I will never make a full-size quilt. No one to make them for and I don’t need any. I do sew things (pillows, runners, table toppers, placemats, hot pads, wine totes, fabric baskets) that include some quilting features. It’s a lot easier to quilt that way. I make things I can quilt on my own machine and I don’t try to quilt a complex pattern. I can complete more projects faster.
Free patterns
One thing I’ve discovered – there are so many free patterns available online. I do occasionally buy one, but only after searching for a free one. (Have I mentioned I’m conservative in my spending?) I found all of these through Pinterest and they’re in my Sew Nice!! board, if you want to find them there. I accumulate patterns in my Pinterest board, so I can find them again when I’m ready to sew.
The other nice thing about these free patterns is I can download them instantly. No waiting for something to be delivered. However, I do have to mention that many purchased patterns also come digitally, usually at a cheaper price than if you want something delivered. The nice thing about digital patterns is I can store them on my laptop and print them when I’m ready to sew.
My goal here is not to include the patterns themselves. I will provide minimal information about the patterns and my own experiences in making the pillow covers. You can contact me if you would like me to send you the patterns. (I will give credit to the designers.) Also, I might be persuaded to make a pillow cover for anyone who asks nicely (and covers the cost)!!
My pillow covers project
I found these three patterns for pillow covers last summer and bought fabric for them soon after. I chose fabrics that could be used across all three pillows, so they clearly go together. But each would be fine on its own. This fabric came from Creekside Quilting, which is a somewhat hidden quilting store off Swanson Blvd. in Clive. They have tons of fabric to choose from, including many fat quarters. I love fat quarters; they can be used in so many projects.
Late last summer, we got new furniture for our downstairs family room. We chose charcoal leather couches and decided they needed something to brighten them up. My fabric choices included colors we’re trying to incorporate – gray, red, white and teal. I also plan to make a runner for the coffee table, that will use all the same fabrics/colors. That’s my next project!!
It’s amazing how quickly these came together. Cutting out the fabric takes the most time. It’s also the most critical. Get that wrong and your dimensions after sewing will be all wrong. For these projects, it was a lot of cutting strips. For some of my projects, I make paper patterns for the pieces that are more challenging (which usually means bigger) to cut out. I’m used to cutting fabric with a pattern, but I’m also getting the hang of using a ruler and a rotary cutter!!
All of these patterns require fabric, batting, muslin (or some other fabric for the “back” of the pillow front), and either an old pillow or a pillow form.
Pillow forms can be purchased or made. Since these pillows are all standard sizes, it was easier to buy the forms. If you have an odd size pillow, it’s best to make your form, but still, make your cover removable. It’s easier to launder a cover than a whole pillow!!
It’s also good to have a self-healing cutting mat and a rotary cutter. It makes cutting all those strips so much easier!!
Daisy Pillow

I fell in love with this pillow the minute I saw it. And it’s easier to make than you might imagine.
It’s important to have a good marking pen because you need to mark where to place the white strips for the flower petals. I recently purchased some from Nancy’s Notions that are perfect. There are many types of “erasable” pens, but I like these because the color stays prominent until you iron the fabric. In the past, I’ve used pens where the color almost disappeared before I even got from the table to the sewing machine!! They come in six colors, which ensures you have the best color for all fabrics.
I prefer using pens where the ink is removed with heat as opposed to water. It’s much easier to iron your work as soon as you’ve completed your stitching. And with these pens, it’s like magic. The color completely disappears.
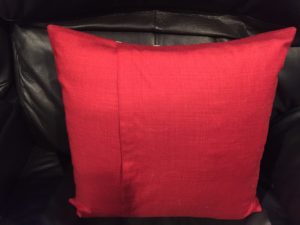
This particular pillow cover requires a 16″ square pillow. It has an envelope back, making it easy to insert the pillow form. If you aren’t familiar with an envelope back, here’s a picture.
Lines Pillow
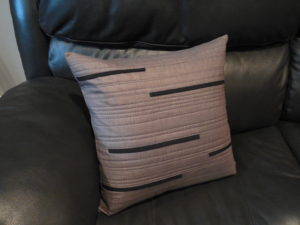
This pillow cover was super easy. Most of my time was spent quilting the lines across it and trying to make them look random and straight. (This is where your marking pens can really help.) The black “lines” on the pillow are fabric strips sewn into the seams of the gray strips. It also requires a 16″ square pillow and has an envelope back.
Diagonal Stripes Pillow
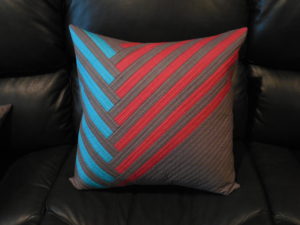
This also is much easier than it looks. Isn’t it gorgeous? I don’t know if you can tell from the featured picture above, but it’s larger than the other two. This one requires a 20″ pillow form.
The original pattern calls for an envelope back, but it instructed you to quilt those pieces as well. There was no reason the back needed to be quilted and it would take more time than it was worth. I ended up making a simple envelope back like the other pillow covers have.
I also created a paper pattern for squaring it up. Squaring it up is necessary because you sew the strips horizontally and perpendicular but the final product is the diagonal stripes. Here’s a picture from the pattern instructions that should make this clearer.
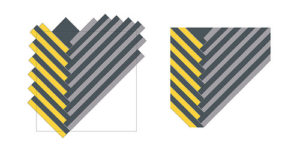
In order to turn this into a 20×20 square, I created a paper pattern and set that on top before I did any cutting. That way, I could see how to make each side 20″ but ensure all sides were squared up together.
I love looking at these pillows on my couch. They add so much color and it’s rewarding to know I made them. And with the envelope backs, I can switch them out when I need a change. Maybe for a Christmas pillow???
I’ll let you know when I finish the matching table runner. I’ve already started cutting the strips for it. I hope I can start sewing this week after I get all my chores done!!
Love the daisy pillow! My favorite flower!
I also love that one!!
I love these pillows Linda. So bright and fun. Thanks for sharing.
Thanks so much. I love making pillows!!